
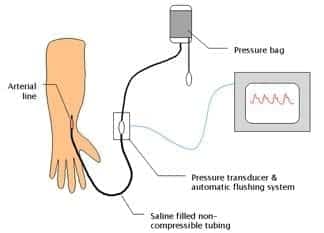
Arterial lines are commonly used in ICUs or operating theatre to continuously monitor a patient’s blood pressure. Patients in the ICU that commonly have arterial lines are those who have gone to the OR, have poor arterial vasculature, have unreliable blood pressure readings, or have multiple vasopressor medications infusing. Prior to the doctor inserting the arterial line, there is some prep work to do. This post talks about the different supplies needed to set up a transducer as well as how to prime the tubing. Be sure to inflate your pressure bag!
OVERVIEW
- arterial catheter connected to a pressure transducer
USES
- blood pressure (systolic, diastolic, mean and pulse pressure)
- arterial blood sampling
Specific indications
- Labile blood pressure
- Anticipation of haemodynamic instability
- Titration of vasoactive drugs
- Frequent blood sampling
- Morbid obesity (unable to fit an appropriately sized NIBP cuff)
DESCRIPTION
- arterial line
- 48 inches of non-compressible rigid-walled, fluid filled tubing
- pressure transducer and automatic flushing system
- pressure bag and automated slow infusion (1-3mL/h) of pressurised saline
- electronic transducer amplifier display
METHOD OF INSERTION AND/OR USE
Mechanism
- fluctuations of vascular pressure cause a pulsation of the saline column
- displaces electromanometer’s diaphragm which has a built in strain gauge (Wheatstone bridge principle)
- deformation leads to a change in resistance of the strain gauge which is sensed electronically
- wave form built up by Fourier analysis from sinusoids or simple wave forms
- wave forms differ depending on where the cannula is inserted
Calibrating (‘zeroing’)
- ensure the transducer pressure tubing and flush solution are correctly assembled and free of air bubbles
- place transducer at level of the right atrium
- ‘off to patient, open to air (atmosphere)’
- press ‘zero’ -> sets atmospheric pressure as zero reference point
- whenever patient position is altered the transducer height should be altered
Square wave test
- aka fast flush test
- snap flush to generate square wave
- check for oscillations as an indicator of the harmonic characteristics of the system
- usually only 1 oscillation before returning to baseline
- 2 or more oscillations before returning to baseline (underdamped)
- if no oscillations (overdamped – response speed is too slow)
ACCURACY AND MEASUREMENT ERRORS
Conditions that must be met to ensure accuracy
- cannula properly placed within the lumen of an unobstructed artery (ie. no spasm, thrombus, atheroma proximal to cannula)
- cannula not kinked or obstructed
- cannula connected by short, rigid, wide-bore tubing to the transducer
- no air bubbles in tubing or transducer
- interface from fluid to transducer accurately transmits deflections
- transducer has adequate frequency response (natural frequency > 100Hz)
- transducer is leveled and zeroed to desired point (ie. left atrium)
- no zero drift
- monitor calibrated accurately
Common sources of error
- bubbles in catheter-transducer system -> decreased resonant frequency
- clotting in arterial catheter
- elastic walls causes increased damping
- cannula won’t flush – kinked, clotted, tissued
OTHER INFORMATION
Information other than blood pressure can be obtained:
- pulse rate and rhythm
- effects of dysrhythmia on perfusion
- ECG lead disconnection
- continuous cardiac output using pulse contour analysis
- specific wave form morphologies might be diagnostic
— e.g. slow rising = AS, pulsus alternans = tamponade - pulse pressure variation (suggests fluid responsiveness)
- steeper upstroke of pulse pressure = increased contractility
- area under upstroke = SV
- steep downstroke = low SVR
Advantages of using MAP rather than SBP/DBP
- least dependent on measurement site or technique (whether invasive or not)
- least altered by damping
- determines tissue blood flow via autoregulation
Variation in arterial waveform at different sites
- arterial waveform morphology varies with site of measurement as a result of the physical characteristics of the vascular tree (impedance and harmonic resonance)
- The following changes occur as the arterial pressure wave travels peripherally from the central aorta to the periphery:
- arterial upstroke becomes steeper
- systolic peak becomes higher (“distal pulse amplification”)
- dicrotic notch appears later
- diastolic wave becomes more prominent
- end-diastolic pressure becomes lower
- pulse pressure becomes wider
- however the MAP in the aorta remains slightly greater in the aorta than at peripheral sites (as expected for continuous blood flow from central to peripheral vessels)
- the arrival of the pulse is delayed at peripheral sites compared to the central aorta
- e.g. systolic pressure upstroke begins ~ 60 msec later in the radial artery than the aorta
COMPLICATIONS
- Pain
- thrombosis and distal ischaemia
- infection
- increased diagnostic blood loss and anemia
- retrograde air embolism
- inadvertent drug/air injection
- haematoma (+/- nerve compression)
- retroperitoneal haematoma (femoral)
- bowel perforation (femoral)
- vessel damage may lead to stricture and prevent future AV fistula formation for haemodialysis
- pseudo-aneurysm
- arterial dissection
- arteriovenous fistula
EVIDENCE
- A 2014 observational study using propensity matching based on the Project IMPACT database found no mortality benefit for use of arterial catheters in medical ICU patients requiring mechanical ventilation.
Arterial Line Transducer Set-Up
Five Things You Need:
1. 500ml NS
2. Pressure Bag
3. Transducer Set (new sets will have syringe)
4. Transducer Holder (attaches to IV pole)
5. Transducer Pressure Cable
Part I: Preparation and Pressure Bag Set-up
1. Open the transducer set
2. Tighten all the connections on the set
3. Close the syringe (if present). You should feel a click
4. Spike NS bag
5. Place NS in pressure bag and pump to 300mg Hg and turn stopcock to upwards position (to
keep pressure bag inflated)
6. Hang pressure bag with NS on IV pole and clamp IV tubing
7. Clip transducer holder on IV pole so you can read words on it
8. Place syringe in in transducer holder pointing upwards (so you can read label on syringe)
9. Place transducer in transducer holder (so electric cable connector is downwards)
Part 2: Removing all air bubbles from IV tubing
1. Unclamp all the IV tubing
2. Point stopcock at the transducer UPWARDS (off towards the patient)
3. Pull on blue tab and allow fluid to flow from NS bag and out of port with WHITE cap on it at
transducer to clear all air bubbles in first half of IV tubing
4. Now point stopcock at the transducer HORIZONTAL (off towards port with WHITE cap on it)
5. Pull on blue tab and allow fluid to flow from NS bag and out through all the IV tubing
Part 3: Zero the arterial transducer
1. Hook up the Transducer Pressure Cable to the red port on the side of the monitor (use left red
port at NYU on monitor) and then to transducer, a flat pressure wave should appear, you
should see artifact when you move the end of your tubing
2. Level stop-cock on the transducer to the phlebostatic axis of the patient (intersection of 4th
intercostal space and midaxillary line). You are leveling to the heart.
3. Turn the stopcock at the transducer UPWARDS (off to the patient)
4. Take the WHITE cap at the transducer off, now tubing is open to air
5. Hit “Zero” on monitor, then hit “Zero ABP”
6. Replace WHITE cap with BLUE cap (provided in transducer set)
7. Turn stopcock at transducer HORIZONTAL (off to atmospheric air)
8. Attach set-up to patient (you should see a waveform on the monitor)
ENTIRE pressure set-up can be completed and ready to go before arterial line insertion. Don’t wait, you will give yourself more time.
Troubleshooting
Over-damped (Flattened waveform):
– Check set up for air, kinks (most-common problem righ after set up)
– Check to assure pressure bag is fully inflated
– Check to assure no WHITE caps left in the set up
– Check to assure the tubing connected to your patient?
– Check to assure the set-up is levelled correctly
– Check to assure the scale is correct on the monitor
Under-damped (“fling” in waveform):
– Check set-up for air
– Remove extra tubing or extra stopcocks
REFERENCES