
The use of skin grafts is a traditional technique to promote the healing of acute and chronic wounds. There are different types of skin graft. Skin grafting is a surgical procedure that involves removing skin from one area of the body and moving it, or transplanting it, to a different area of the body. This surgery may be done if a part of your body has lost its protective covering of skin due to burns, injury, or illness.
Depending on the origin:
- Autograft or autologous graft: skin obtained from the patient’s own donor site.
- Allograft or heterologous graft: skin obtained from another person
- Xenograft or heterograft: skin from other species, such as pigs.
- Synthetic skin substitutes: manufactured products that work as skin equivalents. They may be epidermal (keratinocyte cultures), dermal or dermoepidermal (artificial skin).

Only autografts are considered permanent. The rest, either because of their composition (degradable by the host) or because of their origin (rejected by the host’s immune response), only provide temporary coverage during a few weeks.
In our daily clinical practice, in chronic wound clinics, we normally use autologous grafts which, depending on their thickness, are classified into:
- Total skin graft: includes epidermis and dermis. The incision is made up to the subcutaneous tissue and a wedge of skin is obtained. The edges of the resulting defect in the donor site are approximated by sutures.
- Split-thickness skin graft: its thickness ranges from 0.2 to 0.4 mm. The cutting plane is located above the hair follicles which, by remaining in the donor site, allow healing by secondary intention. They are divided into thin and thick split-thickness skin grafts.
- Epidermal graft: it is formed solely by epidermis. The traditional methods for obtaining epidermal grafts, based on the suction technique, were tedious. Recently, a device has been commercialized, Cellu Tome, that obtains epidermal micrografts applying heat and negative pressure on the skin. Separation occurs at the level of the lamina lucida, at the dermoepidermal junction.1 The exact mechanism of action of epidermal micrografts in the wound bed is unknown. Clinical experience seems to indicate that it depends on the quality of the recipient bed. Therefore, in many cases wound reepithelization occurs primarily from the edges of the wound and not by the attachment of the grafts, which would behave as promoters of healing by releasing growth factors.1
Why are skin grafts done?
A skin graft is placed over an area of the body where skin has been lost. Common reasons for a skin graft include:
- skin infections
- deep burns
- large, open wounds
- bed sores or other ulcers on the skin that haven’t healed well
- skin cancer surgery
Which type of graft should you choose? It depends on the wound. As we have seen in the previous post, in order to consider that a wound is prepared for skin grafting, it must meet certain requirements, such as an adequate granulation tissue. However, it is necessary to take into account other factors that will influence the outcome of the intervention, such as the location of the wound, the extent, the underlying pathology and the needs or comorbidities of the patient.
- When the vascular supply of the wound is low, the use of thin grafts is recommended. This a typical finding in our wound clinic.
- The contraction of the wound will be greater if there is less viable dermis, such as in thin grafts, which worsens the aesthetics and functionality of the scar. An interesting alternative, used predominantly in extensive wounds and in areas where maintaining mobility is essential, is the use of synthetic dermal substitutes in combination with autologous thin partial thickness skin grafts. Dermal substitutes are sheets with a layer formed mainly by bovine or porcine collagen, which is placed on the wound bed, and another protective silicone layer. After a few weeks, when a suitable dermis is achieved, the silicone sheet is removed and the skin graft is placed.
- The device to obtain epidermal micrografts (Cellu Tome), might represent an interesting alternative to thin partial skin grafts. This method is simple, does not require anesthesia and minimizes complications in the donor site.1 It is especially interesting in cases of pyoderma gangrenosum because, being minimally invasive, there will be no phenomenon of pathergy in the donor site.2 If you want to know more about epidermal grafts, read the post “Differences between epidermal and dermo-epidermal punch grafts”
What techniques do we normally use to obtain autologous split-thickness skin grafts?
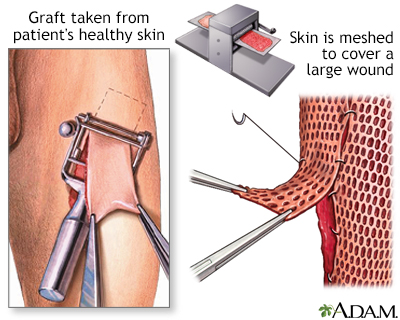
A. Mesh graft.
It is obtained with a dermatome and must be performed in an operating theatre. The main benefit of using a graft with grids is that you can save tissue from the donor site (it can expand several times its size). The interest of this meshing is based on the principle of continuous growth of the keratinocytes, which end up filling the free spaces. On the other hand, this lack of continuity allows fluid to drain through the holes in the graft, which prevents the formation of hematoma or seroma.
For graft taking, it is essential an intimate contact between wound bed and the graft, especially the first 3-5 days. This is not always easily achieved by pressing with gauze and bandages, so the concomitant use of negative pressure therapy may be helpful.
B. Punch grafts (also called micrografts)
Punch grafting does not require the use of complex instruments and can be performed in the consultation room. This is the technique that we normally use in our wound clinic.
There are different methods of obtaining micrografts, which normally have a diameter between 4 and 6 mm. A curette, scissors, scalpel or punch can be used.3 The fragments obtained from the donor site, which will usually be the anterior face of the thigh, are placed with tweezers on the wound bed, a few millimetres apart from each other. The donor site heals by secondary intention, with the placement of a hydrocolloid dressing or alginate, depending on the bleeding (read post “Which dressing do I choose to cover the skin graft donor site?”). The recipient site is covered with a non-adherent interface dressing and a secondary dressing, or directly with a sheet of calcium alginate fibres as the primary dressing and gauze as the secondary dressing. Local pressure will be applied and compression bandage or discharge will be applied, depending on the aetiology. The first dressing change of the grafted area will be carried out after 5-7 days.
Graft taking will depend on the wound bed characteristics (good quality of granulation tissue and little slough), the bacterial load, the immobilization in the days following the intervention and a conservative attitude during the first dressing changes.

Even if not all micrografts adhere to the wound bed, the effect is beneficial in healing, as there is a decrease in pain and growth factors are released. It is essential the conservative cleansing in the first cures, avoiding any kind of debridement in order not to remove the micrografts and maintain the microenvironment that has been created. A few touches with a gauze soaked in physiological serum will be sufficient.
Types of skin grafts
There are two basic types of skin grafts: split-thickness and full-thickness grafts.
Split-thickness grafts
A split-thickness graft involves removing the top layer of the skin — the epidermis — as well as a portion of the deeper layer of the skin, called the dermis. These layers are taken from the donor site, which is the area where the healthy skin is located. Split-thickness skin grafts are usually harvested from the front or outer thigh, abdomen, buttocks, or back.
Split-thickness grafts are used to cover large areas. These grafts tend to be fragile and typically have a shiny or smooth appearance. They may also appear paler than the adjoining skin. Split-thickness grafts don’t grow as readily as ungrafted skin, so children who get them may need additional grafts as they grow older.
Full-thickness grafts
A full-thickness graft involves removing all of the epidermis and dermis from the donor site. These are usually taken from the abdomen, groin, forearm, or area above the clavicle (collarbone). They tend to be smaller pieces of skin, as the donor site from where it’s harvested is usually pulled together and closed in a straight-line incision with stitches or staples.
Full-thickness grafts are generally used for small wounds on highly visible parts of the body, such as the face. Unlike split-thickness grafts, full-thickness grafts blend in well with the skin around them and tend to have a better cosmetic outcome.
How to prepare for a skin graft
Your doctor will likely schedule your skin graft several weeks in advance, so you’ll have time to plan for the surgery. Tell your doctor ahead of time about any prescription or over-the-counter medications you’re taking. Certain medicines, such as aspirin, can interfere with the blood’s ability to form clots. Your doctor may instruct you to change your dosage or stop taking these medications before the surgery. Additionally, smoking or tobacco products will impair your ability to heal a skin graft, so your doctor will likely ask you to stop smoking ahead of your surgery.
Your doctor will also tell you not to eat or drink anything after midnight on the day of the procedure. This is to prevent you from vomiting and choking during the surgery if the anesthesia nauseates you.
You should also plan on bringing a family member or friend who can drive you home after the surgery. General anesthesia may make you drowsy after the procedure, so you shouldn’t drive until the effects have fully worn off.
It’s also a good idea to have someone stay with you for the first few days after the surgery. You may need help performing certain tasks and getting around the house.
Skin graft procedure
A surgeon will begin the operation by removing skin from the donor site. If you’re getting a split-thickness graft, the skin will be removed from an area of your body that’s usually hidden by clothing, such as your hip or the outside of your thigh. If you’re getting a full-thickness graft, preferred donor sites are the abdomen, groin, forearm, or area above the clavicle (collarbone).
Once skin is removed from the donor site, the surgeon will carefully place it over the transplant area and secure it with a surgical dressing, staples, or stitches. If it’s a split-thickness graft, it may be “meshed.” The doctor may punch multiple holes in the graft to stretch out the piece of skin so that he or she may harvest less skin from your donor site. This also allows fluid to drain from under the skin graft. Fluid collection under the graft may cause it to fail. In the long term the meshing may cause the skin graft to take a “fish-net” appearance.
The doctor also covers the donor area with a dressing that will cover the wound without sticking to it.
Aftercare for a skin graft
The hospital staff will watch you closely after your surgery, monitoring your vital signs and giving you medications to manage the pain.
If you’ve had a split-thickness graft, your doctor may want you to stay in the hospital for a few days to make sure the graft and the donor site are healing well.
The graft should start developing blood vessels and connecting to the skin around it within 36 hours. If these blood vessels don’t begin to form shortly after the surgery, it could be a sign that your body is rejecting the graft.
You may hear your doctor say that the graft “hasn’t taken.” This may happen for several reasons including infection, fluid or blood collecting under the graft, or too much movement of the graft on the wound. This may also happen if you smoke or have poor blood flow to the area being grafted. You may need another surgery and a new graft if the first graft doesn’t take.
When you leave the hospital, your doctor will give you a prescription for painkillers to help minimize the pain. They’ll also instruct you on how to care for the graft site and the donor site so they don’t get infected.
The donor site will heal within one to two weeks, but the graft site will take a bit longer to heal. For at least three to four weeks after the surgery, you’ll need to avoid doing any activities that could stretch or injure the graft site. Your doctor will tell you when it’s safe to resume your normal activities.
References:
- Richmond NA, Lamel SA, Braun LR, Vivas AC, Serena T, Kirsner RS. Epidermal grafting using a novel suction blister-harvesting system for the treatment of pyoderma gangrenosum. JAMA Dermatol. 2014;150(9):999-1000.
- Nordström A, Hansson C. Punch-grafting to enhance healing and to reduce pain in complicated leg and foot ulcers. Acta Derm Venereol. 2008;88(4):389-91.
- Types of skin grafts to cover chronic wounds: which one should you choose?